说起监控,我们一般会首先想到zabbix
,nagios
,ganglia
等等。但是对于非ops
开发人员而言,这些东西,多多少少让人感到陌生。所以本文将从一个服务端开发人员
的视角,介绍如何通过graphite
,cabot
,加一个shell
定时脚本,搭建监控报警服务。
python环境安装
虽然linux系统上一般都有python环境,但是默认的python版本较低。而且yum
等系统工具,都依赖于默认的python。所以推荐的做法是再安装一个python,并使用virtualenv
等工具,分项目进行环境管理,并与系统默认的python环境进行隔离。
以python2.7.3为例,介绍python环境的安装。
安装步骤
1
2
3
4
5
6
7
8
9
10
11
12
13
14
15
16
17
18
19
20
21
22
23
24
sudo yum install bzip2-devel.x86_64
sudo yum install sqlite-devel.x86_64
sudo yum install readline-devel.x86_64
sudo yum install openssl-devel.x86_64
wget http://www.python.org/ftp/python/2.7.3/Python-2.7.3.tar.bz2
tar jxvf Python-2.7.3.tar.bz2
cd Python-2.7.3
./configure --prefix=/usr/local/python2.7.3
make && sudo make install
cd ..
wget https://pypi.python.org/packages/source/d/distribute/distribute-0.6.49.tar.gz --no-check-certificate
tar zxvf distribute-0.6.49.tar.gz
cd distribute-0.6.49
sudo /usr/local/python2.7.3/bin/python setup.py install
sudo /usr/local/python2.7.3/bin/easy_install pbr
cd ..
wget https://pypi.python.org/packages/source/v/virtualenv/virtualenv-1.10.1.tar.gz --no-check-certificate
tar zxvf virtualenv-1.10.1.tar.gz
cd virtualenv-1.10.1
sudo /usr/local/python2.7.3/bin/python setup.py install
sudo /usr/local/python2.7.3/bin/easy_install virtualenvwrapper
如果遇到 [FATAL] Failed to create text with cairo, this probably means cairo cant find any fonts. Install some system fonts and try again。可以尝试安装bitmap font。
1
2
sudo yum install bitmap.x86_64
sudo yum install bitmap-fonts-compat.noarch
相关配置
为了便于环境的统一管理,创建一个普通用户进行新创建python环境的管理和相关python扩展的安装。同时,向数字公司的addops
们致敬。
1
2
sudo mkdir -p /data/server/python-envs
sudo chown -R appops.appops /data/server
1
sudo su appops -c 'vim ~/.bashrc'
添加如下内容
1
2
3
4
export WORKON_HOME=/data/server/python-envs
export VIRTUALENVWRAPPER_PYTHON=/usr/local/python2.7.3/bin/python
export VIRTUALENVWRAPPER_VIRTUALENV=/usr/local/python2.7.3/bin/virtualenv
source /usr/local/python2.7.3/bin/virtualenvwrapper.sh
搭建graphite监控服务
安装步骤
1
2
sudo mkdir /opt/graphite
sudo chown -R appops.appops /opt/graphite
1
2
3
sudo su appops
source ~/.bashrc
mkvirtualenv graphite
1
2
3
4
5
6
7
8
pip install whisper
pip install carbon
pip install graphite-web
pip install django==1.5
pip install django-tagging
pip install uwsgi
pip install MySQL-python
pip install daemonize
graphite使用cairo
进行绘图,由于系统自带的cairo版本较低(需要cairo1.10以上),使用pip安装cairo会出错,所以采用编译安装。
1
2
3
4
5
6
7
wget http://cairographics.org/releases/pycairo-1.8.8.tar.gz
tar zxvf pycairo-1.8.8.tar.gz
python -c "import sys; print sys.prefix"
cd pycairo-1.8.8
./configure --prefix=/data/server/python-envs/graphite
make
make install
1
2
3
4
5
6
7
8
9
10
11
12
bin -- 数据收集相关工具
conf -- 数据存储相关配置文件
carbon.conf -- 数据收集carbon进程涉及的配置
dashboard.conf -- Dashboard UI相关配置
graphite.wsgi -- wsgi相关配置
storage-schemas.conf -- Schema definitions for Whisper files
whitelist.conf -- 定义允许存储的metrics白名单
graphTemplates.conf -- 图形化展示数据时使用的模板
examples -- 示例脚本
lib -- carbon和twisted库
storage -- 数据文件存储目录
webapp -- 数据前端展示涉及程序
配置Graphite-web
1
2
3
4
5
cd /opt/graphite/webapp/graphite
cp local_settings.py.example local_settings.py
cp /opt/graphite/conf/graphite.wsgi.example /opt/graphite/conf/graphite.wsgi
cp /opt/graphite/conf/graphTemplates.conf.example /opt/graphite/conf/graphTemplates.conf
cp /opt/graphite/conf/dashboard.conf.example /opt/graphite/conf/dashboard.conf
修改或者增加如下配置:
1
2
3
4
TIME_ZONE
DEBUG
SECRET_KEY
DATABASES
示例配置文件local_settings.py
1
python manage.py syncdb
1
uwsgi --http localhost:8085 --master --processes 1 --home /data/server/python-envs/graphite --pythonpath /opt/graphite/webapp/graphite --wsgi-file=/opt/graphite/conf/graphite.wsgi --enable-threads --thunder-lock
配置数据收集服务
1
2
3
cp /opt/graphite/conf/carbon.conf.example /opt/graphite/conf/carbon.conf
cp /opt/graphite/conf/storage-schemas.conf.example /opt/graphite/conf/storage-schemas.conf
cp /opt/graphite/conf/whitelist.conf.example /opt/graphite/conf/whitelist.conf
编辑/opt/graphite/lib/carbon/util.py
,将
from twisted.scripts._twistd_unix import daemonize
替换成
import daemonize
否则启动cabon时会遇到ImportError: cannot import name daemonize
。
1
vim /opt/graphite/conf/whitelist.conf
添加
^test\..*
^server\..*
即只存储以test.
和server.
开头的metrics。
1
vim /opt/graphite/conf/storage-schemas.conf
添加
1
2
3
4
5
6
7
[server]
pattern = ^server\..*
retentions = 60s:1d,5m:7d,15m:3y
[default]
pattern = ^test\..*
retentions = 60s:1d,5m:7d
上面的配置,会对于test.
开头的metrics,以60秒为精度存储一天,以5分钟为精度存储7天。即查询一天内的数据时,可以精确到1分钟,查询7天内的数据时,只能精确到5分钟。
1
python /opt/graphite/bin/carbon-cache.py --config=/opt/graphite/conf/carbon.conf --debug start
收集监控数据
etsy开源了一个叫statsd 的daemon,可用于将监控数据收集到graphite,但那玩意是nodejs写的。
为了保持方案的简单,采用crontab
的方式,利用shell脚本 将要收集的数据通过udp协议直接发送至graphite。
1
2
3
4
5
6
7
8
9
10
11
12
13
14
15
16
17
#!/bin/sh
HOST=$(hostname | awk -F'.' '{print $1}')
IDC="local"
SYSTEM_LOAD=$(awk '{print $1}' /proc/loadavg)
SYSTEM_MEMORY_FREE=$(free -m | grep 'buffers/cache' | awk '{print $NF}')
SYSTEM_SWAP_USE=$(free -m | grep 'Swap' | awk '{print $(NF-1)}')
SYSTEM_DISK_USED=$(df -h | grep '/' | awk 'BEGIN{_max=0}{len=length($5);i=substr($5,0,len-1);if(_max<i){_max=i}}END{print _max}')
TIMESTAMP=$(date +%s)
### send to garphite through udp port 2003 ########
echo -n "server.$IDC.$HOST.system.load $SYSTEM_LOAD $TIMESTAMP" > /dev/udp/127.0.0.1/2003
echo -n "server.$IDC.$HOST.system.memory_free $SYSTEM_MEMORY_FREE $TIMESTAMP" > /dev/udp/127.0.0.1/2003
echo -n "server.$IDC.$HOST.system.swap_used $SYSTEM_SWAP_USED $TIMESTAMP" > /dev/udp/127.0.0.1/2003
echo -n "server.$IDC.$HOST.system.disk_used $SYSTEM_DISK_USED $TIMESTAMP" > /dev/udp/127.0.0.1/2003
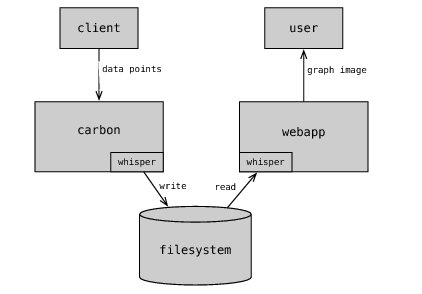
监控数据收集和展示流图
搭建cabot报警服务
cabot
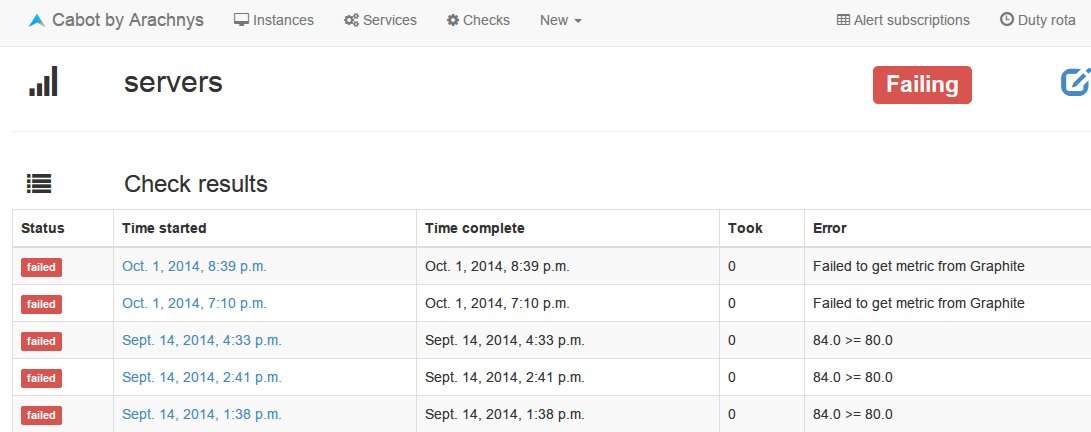
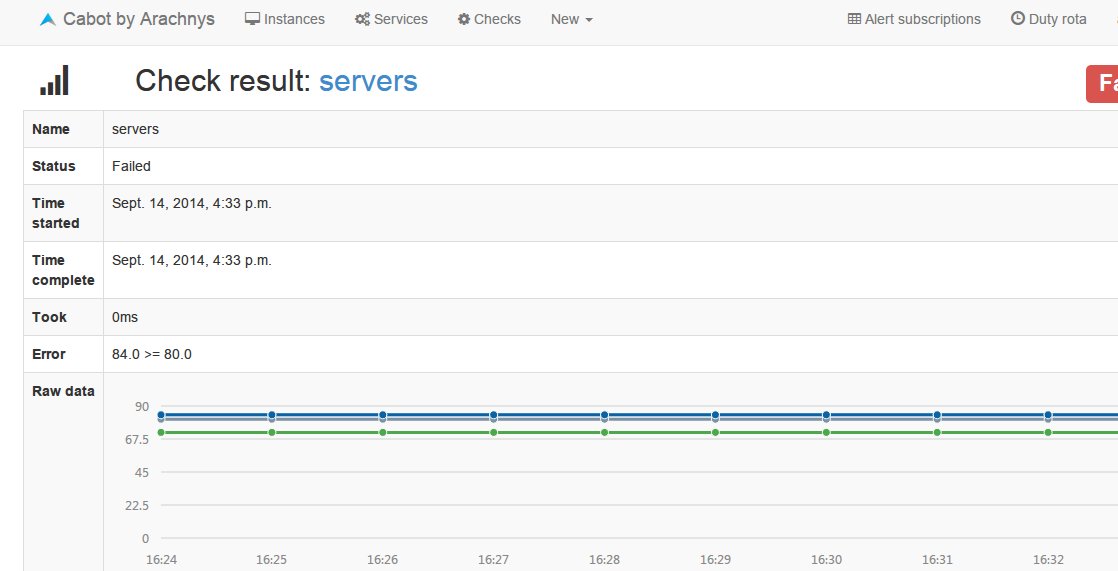
是一个轻量级的监控报警服务。其报警可以基于:
graphite收集的监控数据
url的响应内容和状态码
jenkins编译任务的状态
1
2
3
sudo gem sources --remove http://rubygems.org/
sudo gem sources -a http://ruby.taobao.org/
sudo gem install foreman
因为foreman要求ruby版本需要在1.9.3以上,如果系统自带ruby版本过低,可以通过rvm安装ruby,再安装foreman。
1
2
sudo yum install npm
sudo npm install -g coffee-script [email protected] --registry http://registry.npmjs.org/
1
2
3
4
sudo su appops
mkdir /data/server/alter
cd /data/server/alter
mkvirtualenv cabot
1
2
3
git clone https://github.com/arachnys/cabot.git
cd cabot
cp conf/development.env.example conf/development.env
修改setup.py ,添加
'MySQL-python==1.2.5',
1
2
python setup.py install
/bin/sh ./setup_dev.sh
使用foreman启动cabot时,会先读取.foreman
# vi: set ft=yaml :
procfile: Procfile.dev
env: conf/development.env
Procfile.dev
内容如下:
web: python manage.py runserver 0.0.0.0:$PORT
celery: celery -A cabot worker --loglevel=DEBUG -B -c 8 -Ofair
其中定义了启动cabot-web和celery任务队列时使用的命令,针对不同的环境,可以酌情修改.foreman
和对应的procfile
及env
。
对于邮件报警,需要修改conf/development.env 中的如下内容:
1
2
3
4
5
6
7
8
9
DATABASE_URL -- 数据库配置
TIME_ZONE -- 时区
ADMIN_EMAIL
CABOT_FROM_EMAIL
CELERY_BROKER_URL -- celery任务队列配置
SES_HOST -- smtp host
SES_USER -- 发送邮件的用户
SES_PASS -- 发送邮件用户的密码
SES_PORT -- smtp port
1
nohup foreman start 2>&1 > /dev/null &
reference:
[^1] http://graphite.readthedocs.org/en/latest/overview.html
[^2] http://cabotapp.com/qs/quickstart.html
[^3] https://gist.github.com/jirutka/8636572